How to Restart a Pod in Kubernetes
• Understand the different Kubernetes pod states
• Understand various ways to restart a pod
• Understand how Mezmo aids in the process of monitoring pods
Kubernetes is used to distribute and manage containerized applications within a cluster of servers. The minimum abstraction over a container in Kubernetes is a pod. A pod may contain one or more containers that work in conjunction. When a pod doesn't work well for some reason, you'll need to restart it using manual or automated steps.
This article will explain the different possible states of a pod within a Kubernetes cluster. Then, we will demonstrate the procedures for restarting Kubernetes pods and containers within those pods. Finally, we will show you how to use logs and real-time alerts to see if a pod is down and decide if you need to restart it.
Let's get started.

Kubernetes Pod States
Kubernetes treats pods as workers and assigns them certain states. Initially, the pod's status is "pending." Then, if all goes well, the status will transition to "running." If the pod doesn't start correctly for some reason, it will show that it "failed." The status might also show that the pod is "terminating," When it has done so successfully, it will show that it "succeeded." In this case, the pod won't need to restart. If K8s cannot query the pod directly, it will show that its status is "unknown."
For example, when you deploy a simple pod into a cluster, it will go through several status changes as follows:
“ContainerCreating” is not a valid pod state in the example above. It represents one of the two different init container states that will run within the pod. The other init container state is “PodInitializing,” which indicates that the pod is currently running one of its init containers. There can be multiple containers running apps within a pod, and there can also be various init containers running one after the other. You can learn more about init containers in the official docs.
Kubernetes actively monitors the status of each pod and records it in an event log. For example, the event log of the previous workflow would look like this:
Sometimes something will go wrong with the pod, and you will need to know how to restart it. We will explain the different ways to restart a Kubernetes pod next.

Restarting Kubernetes Pods
To restart a Kubernetes pod, you can issue commands using the kubectl tool that connects with the KubeAPI server. Although there are no direct commands to restart a pod (such as a restart command), there are several ways to force a pod to change its status (and thus effectively restart it). Let’s explore the available options:
Restarting a Container within a Pod
A pod can contain multiple containers. However, when you connect to a pod, you essentially connect to the main container within that pod. If you have defined multiple containers, you can connect to each one of them. For example, you can apply the following multicontainer pod spec:
This defines two containers and a shared volume. The NGINX container will serve the HTML file, and the Ubuntu container will write a date stamp to that HTML file every 1 second.
When you try to connect to that pod, it will pick up the first container (NGINX) by default since you didn’t specify which container to connect to:
Now that you are within a running container, you can try to kill the PID 1 process within that container. To do so, run the following as root:
Or, you can use the kubectl tool:
Now, if you query the pod spec, you will find that K8s will try to restart the killed container:
As you can see, the last state was “terminated” and the current state is “running.” This indicates that the container was restarted. Not all containers have access to root credentials, however, so this approach might not work all the time.
Restarting a Pod By Scaling
The most straightforward way to restart a pod is to scale its replica count to 0 and then scale it up to 1. Since you cannot use the scale command on pods, you will need to create a Deployment instead. Here’s how you can do that quickly:
Next, scale to 0 and then to 1. This will terminate the pod and then redeploy it to the cluster:
The same operation can be performed for StatefulSets and ReplicaSets as well.
Restarting a Pod by Deleting It and Redeploying It
Obviously, you could just delete a pod (or a ReplicaSet or Deployment) and then redeploy it using the kubectl delete command. This method is quite destructive though, so it’s not really recommended.
Restarting a Pod Using Rollout
The above method for restarting a pod is a very manual process – you have to scale the replica count down and then up, or you have to delete the pod and then create a new one. Beginning with Kubernetes version 1.15, you can perform a rolling restart of a Deployment. This is the recommended way of restarting a pod. It’s as easy as running the following command:
Now, if you monitor the Deployment status on another terminal, you will see the following chain of events:
It will spin up another replica of the pod, and if it’s healthy, it will scale down the old replica of the Deployment. There you have it. The end result is the same, but Kubernetes handled the underlying orchestration in this method.
Now that you have a good idea of how to restart a container or pod with K8s, let’s take a look at how to monitor them using Mezmo.

Using Mezmo to Monitor Pod States
Using the Mezmo platform, you can monitor, track, and alert on pod status changes – including restart counts. You can perform this task by following two simple steps.
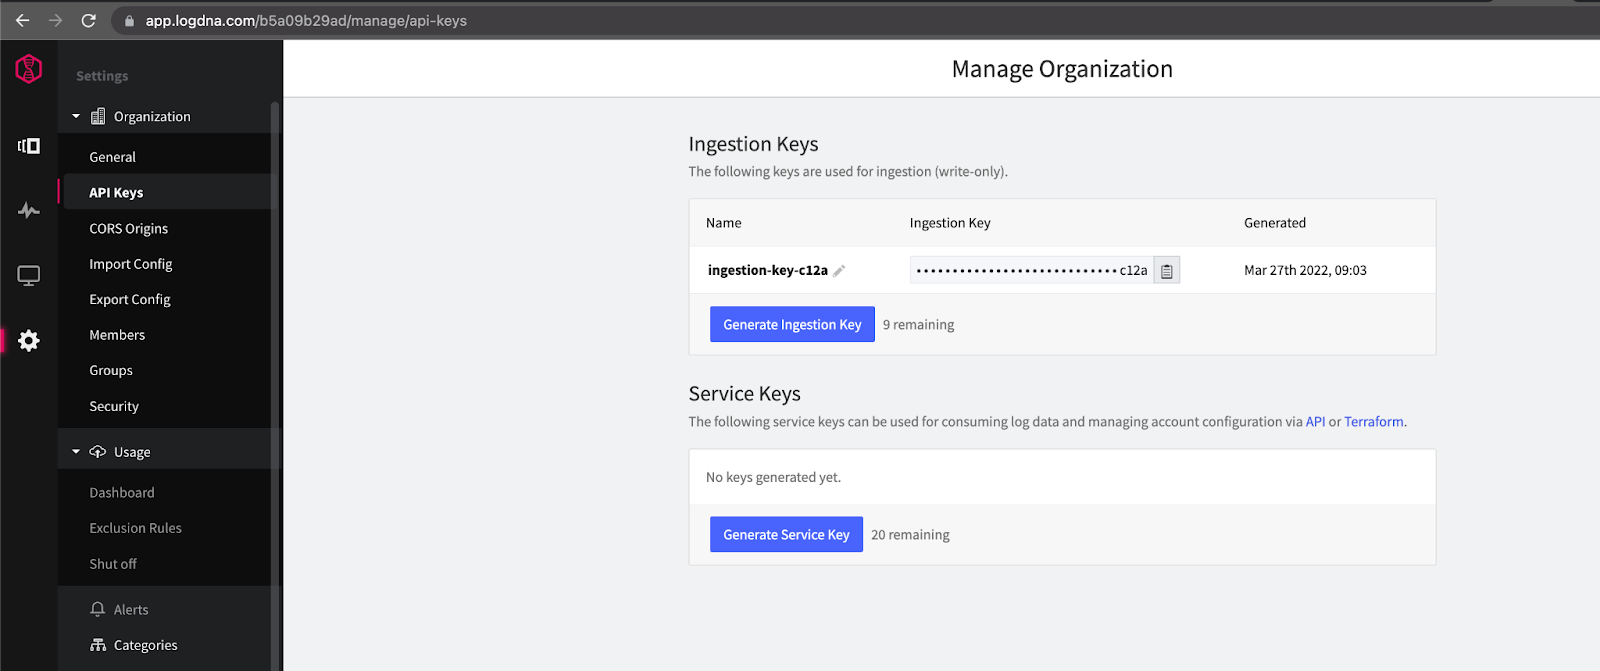
The first step is to install the LogDNA daemon agent to the K8s cluster and start ingesting log events. You need to create a new ingestion key for the collection agent. This key can be created by navigating to Manage Organization-> API Keys, as shown in the image below:

Now, just copy and paste the ingestion key, then deploy the LogDNA agent daemonset using the following commands:
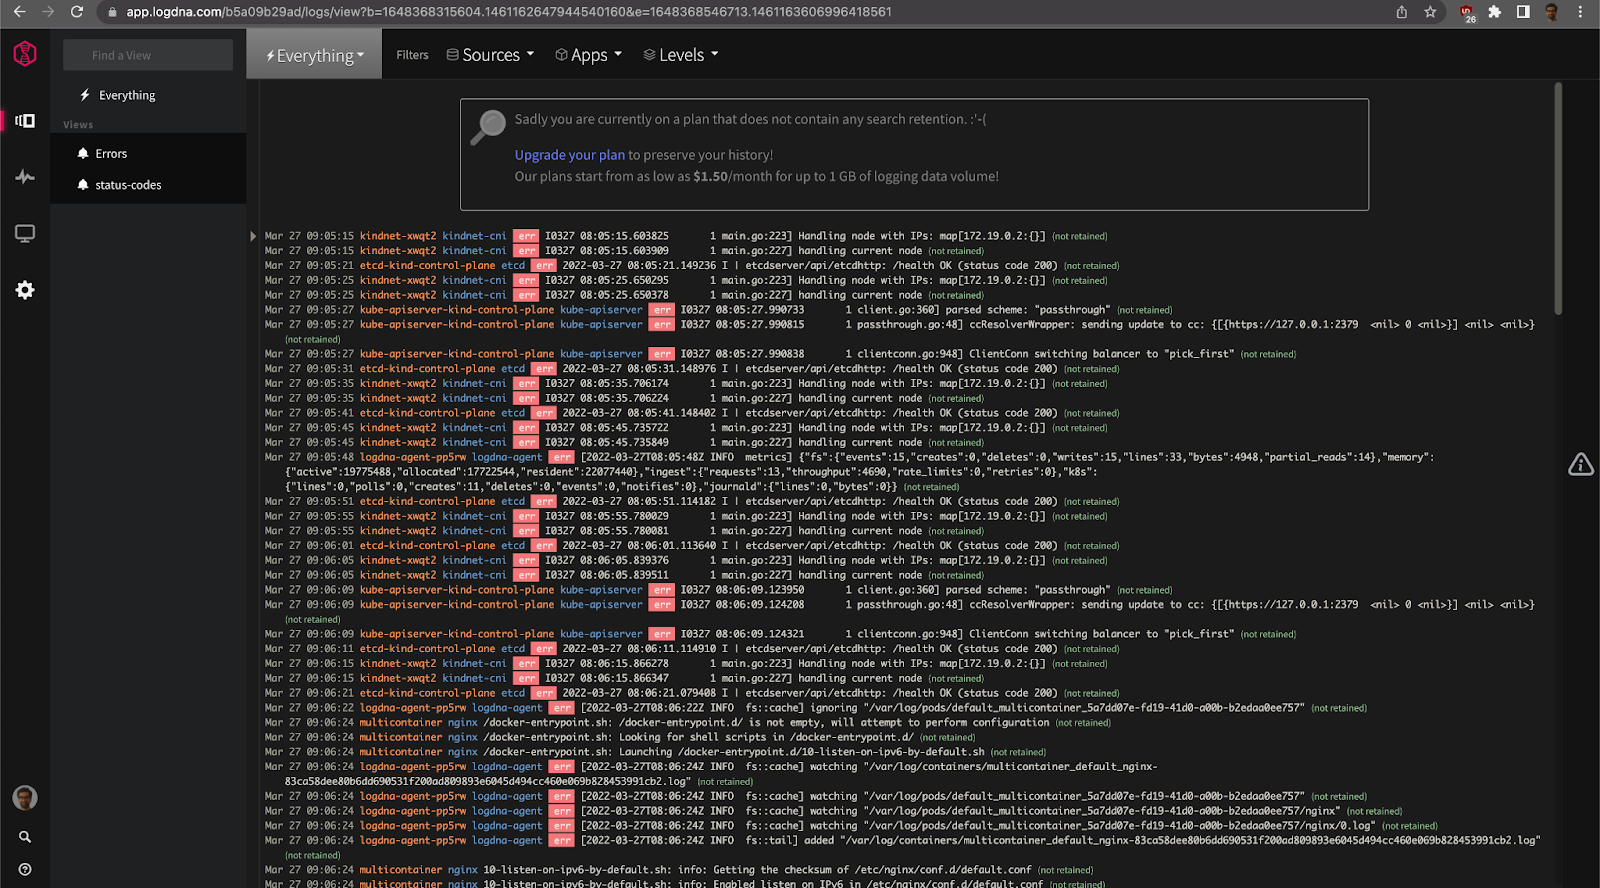
Next, switch to your dashboard. After a while, you will start to receive log data from the cluster:

The second step involves setting up monitoring and alerting for pod restarts. Before you assign alerts, you might want to spend some time analyzing the log data so you understand the various events that are happening in the cluster.
Now, run some Deployments and try scaling down with a rolling restart. Or, try to restart the containers.
You will notice some common log events when a container is being restarted:

As you can see, the event log shows that the NGINX Deployment received a SIGQUIT OS signal for PID 1 indicating the termination of this process.
For the scaling down request, you can expand the log entry to see the kube-controller-manager-kind-control-plane event log. You can specify the event name, the reason, and the Deployment label:

You will notice the following entry for the container kill event:

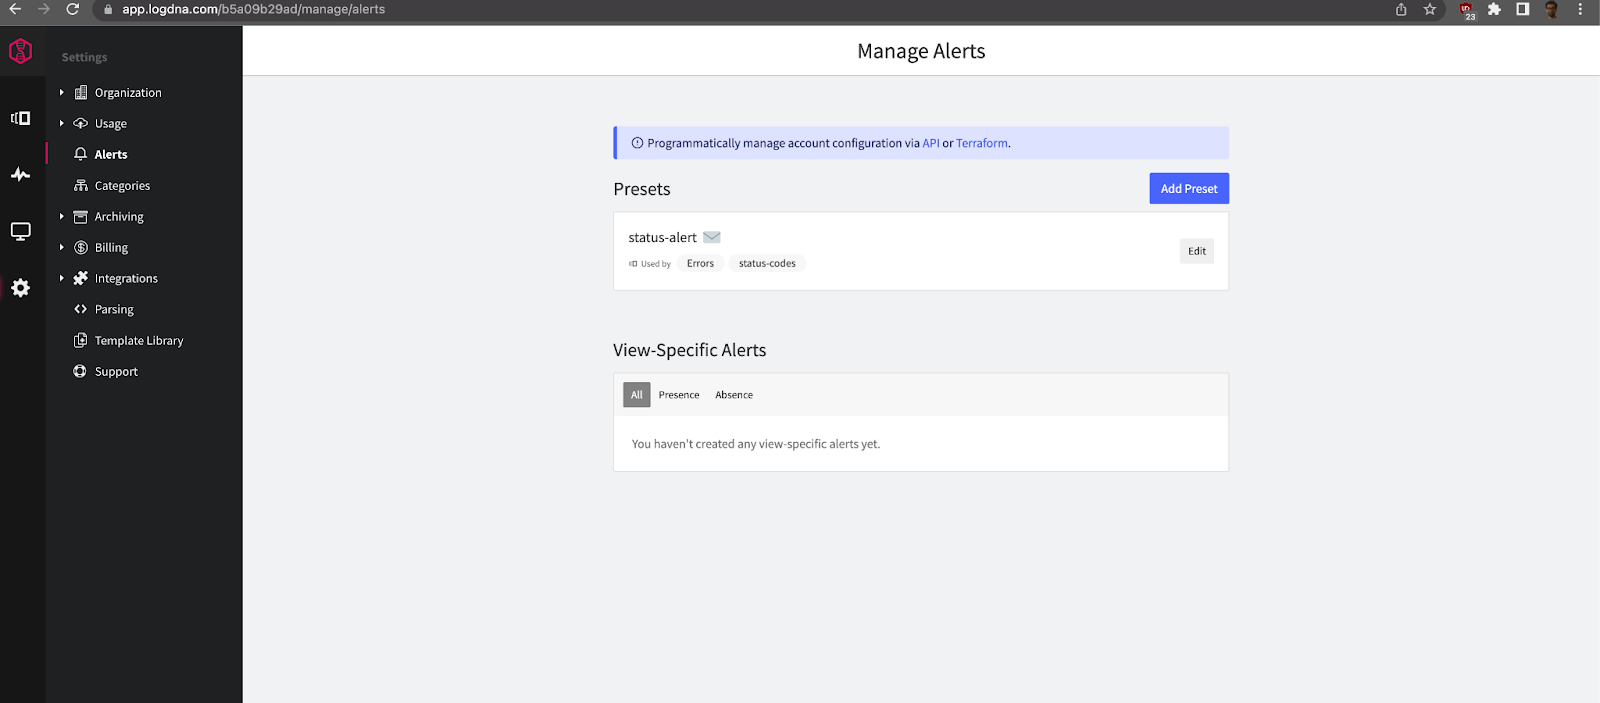
All of these events can be extracted as alert conditions to notify interested parties when the pod is restarting. You can create alert presets with minimum thresholds using the Manage Alerts Screen:

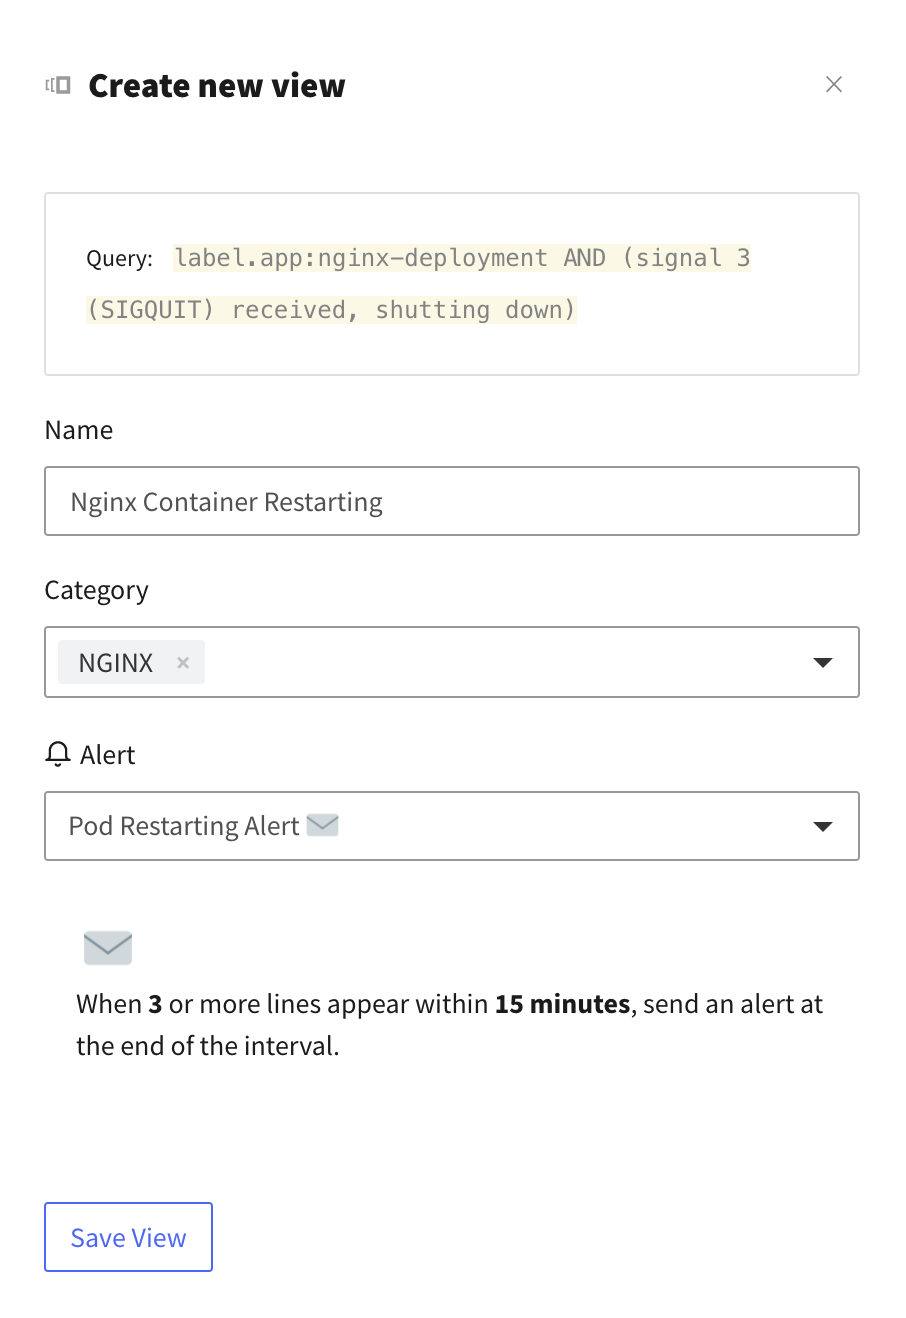
You can set email alerts or Slack notifications to tell you when the container is restarting or about to be restarted. Once you save the alert presets, you need to create relevant views to attach to them. For example, to create a view for the previous SIGTERM event, you need to enter the following query to the search input on the bottom half of the screen:
When you create a new view, you can attach the alert you created earlier:

Feel free to experiment with creating new views and attaching alerts. For example, you might want to be notified when a pod is terminated and restarted because of an OOM issue. When this happens, the pod status will be “OOMKilled” and the exit code might be 137. This means that K8s terminated the pod because it reached its memory limit.

Conclusion
In this article, we introduced you to the various states of Kubernetes pods and explained several methods for restarting them. The recommended way to continue pods is to perform a graceful restart using the kubectl rollout command, enabling you to inspect the status and respond more rapidly if something goes wrong.
With Mezmo, monitoring the status of a pod or container and setting up alerts has never been easier. They offer a long list of integrations that include Kubernetes metrics and events within your cluster.
Related Articles
Share Article
Ready to Transform Your Observability?
- ✔ Start free trial in minutes
- ✔ No credit card required
- ✔ Quick setup and integration
- ✔ Expert onboarding support


